JWT 인증 과정 정리하기 위해 작성해 본다.
JWT 생성 과정은 생략한다.
dependency
스프링 시큐리티와 JWT를 사용하기 위한 라이브러리를 추가한다.
dependencies {
        implementation 'org.springframework.boot:spring-boot-starter-web'
        implementation 'org.springframework.boot:spring-boot-starter-security'
        implementation 'com.auth0:java-jwt:3.18.1'
}
시큐리티 설정을 해준다. 일단 configure()는 기본만..@EnableWebSecurity로 시큐리티 사용을 설정하면, 자동으로 스프링 시큐리티에서 몇 가지 URL을 생성한다.
@RequiredArgsConstructor
@EnableWebSecurity
public class SecurityConfig extends WebSecurityConfigurerAdapter {
     @Override
    protected void configure(HttpSecurity http) throws Exception {
        http.csrf().disable()
                .cors().and()
                .sessionManagement().sessionCreationPolicy(SessionCreationPolicy.STATELESS)
                .and()
                .authorizeRequests()
                .anyRequest().authenticated();
    }
}
UsernamePasswordAuthenticationFilter 구현
UsernamePasswordAuthenticationFilter를 상속받아 로그인, 로그인 실패, 로그인 성공 처리를 한다.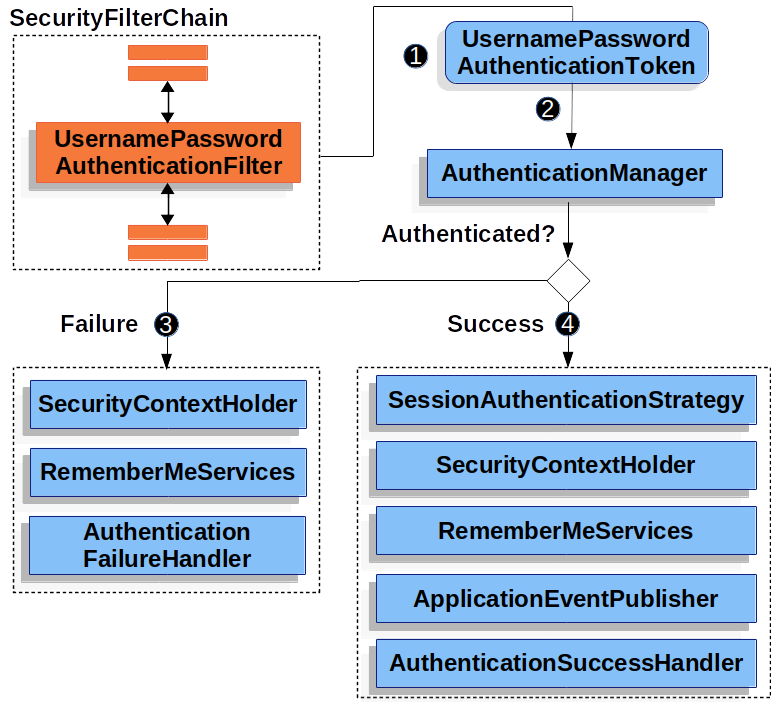
- 사용자가 아이디(username)과 비밀번호를 입력하면,
UsernamePasswordAuthenticationFilter는UsernamePasswordAuthenticationToken을 생성한 후AuthenticationManager로 전달다.- 그 후 해당 유저에 대한 검증은
AuthenticationManager가 처리하게 된다.
AuthenticationManager는 스프링시큐리티의 필터에서 인증된 값을 정의하는 API로SecurityContextHolder에 인증 값을 저장한다.
@Slf4j
public class CustomAuthenticationFilter extends UsernamePasswordAuthenticationFilter {

    /* 로그인 경로로 요청이 왔을 때 호출되는 메서드 */
    @Override
    public Authentication attemptAuthentication(HttpServletRequest request, HttpServletResponse response) throws AuthenticationException {
        String username = request.getParameter("username");
        String password = request.getParameter("password");

        // username과 password를 이용해 Authentication 타입의 토큰 생성
        UsernamePasswordAuthenticationToken authenticationToken = new UsernamePasswordAuthenticationToken(username, password);
        return authenticationManager.authenticate(authenticationToken);
    }
}
만약
username과password외에 다른 값을 입력받고 싶다면request.getParameter()를 이용할 수 있다.
그 후UsernamePasswordAuthenticationToken의details에 해당 값을 세팅하는 방식으로 사용했는데 맞는지는 모르겠음🥲
검증 후 성공, 실패 처리는 successfulAuthentication()과 unsuccessfulAuthentication()를 통해 한다.
    /* 로그인에 성공했을 때 호출되는 메서드
    * accessToken, refreshToken 응답 값에 세팅
    * */
    @Override
    protected void successfulAuthentication(HttpServletRequest request,
                                            HttpServletResponse response,
                                            FilterChain chain,
                                            Authentication authentication) throws IOException {
        // 로그인에 성공한 유저
        final String username = (String) authentication.getPrincipal();

        // response body에 넣을 값 생성
         final Tokens tokens = jwtProvider.getTokens(username, authentication);
        Map<String, Object> body = new LinkedHashMap<>();
        body.put("access_token", tokens.getAccessToken());
        body.put("refresh_token", tokens.getRefreshToken());

        response.setStatus(HttpStatus.OK.value());
        response.setContentType(MediaType.APPLICATION_JSON_VALUE);

        new ObjectMapper().writeValue(response.getOutputStream(), body);
    }

    /* 로그인 실패 시 호출되는 메서드
    * AuthenticationService 에서 발생하는 exception handling
    * */
    @Override
    protected void unsuccessfulAuthentication(HttpServletRequest request, HttpServletResponse response, AuthenticationException failed) throws IOException {
        log.error("unsuccessfulAuthentication failed.getLocalizedMessage(): {}", failed.getLocalizedMessage());

        response.setStatus(HttpStatus.UNAUTHORIZED.value());
        response.setContentType(MediaType.APPLICATION_JSON_VALUE);

        Map<String, Object> body = new LinkedHashMap<>();
        body.put("code", HttpStatus.UNAUTHORIZED.value());
        body.put("error", failed.getMessage());

        new ObjectMapper().writeValue(response.getOutputStream(), body);
    }
이제 위에서 작성한 CustomAuthenticationFilter를 등록해준다.
@RequiredArgsConstructor
@EnableWebSecurity
public class SecurityConfig extends WebSecurityConfigurerAdapter {
     @Override
    protected void configure(HttpSecurity http) throws Exception {
        http.csrf().disable()
                .cors().and()
                .sessionManagement().sessionCreationPolicy(SessionCreationPolicy.STATELESS)
                .and()
                .authorizeRequests()
                .anyRequest().authenticated()
                .and()
                .addFilter(new CustomAuthenticationFilter());
    }
}
이제
/login경로로 username과 password를 전달받은 뒤 인증 되는 과정임.
(AuthenticationManager와 AuthenticationProvider도 상황에 맞게 작성해야 함)
토큰 검증
이제 http header에 토큰을 보내면, 서버에서 읽고 유효한 토큰인지 판단하는 과정이 필요하다.
이 과정은 OncePerRequestFilter를 구현해 만들 수 있다.
OncePerRequestFilter는 http 요청 당 한 번만 실행되도록 보장되는 필터다.
요청마다 토큰을 검증해야 하므로 해당 필터를 사용해 검증할 수 있다.
public class CustomAuthorizationFilter extends OncePerRequestFilter {

    private final String TOKEN_PREFIX = "Bearer";

@Override
    protected void doFilterInternal(HttpServletRequest request, HttpServletResponse response, FilterChain filterChain) throws ServletException, IOException {
        if (request.getServletPath().equals("/login")) {    // 로그인은 그냥 건너 뛴다
            filterChain.doFilter(request, response);
        } else {    // 로그인 외 모든 요청에는 filter 처리 한다

            //1. 요청 헤더에서 인증 값을 가져온다.
            String authorizationHeader = request.getHeader(HttpHeaders.AUTHORIZATION);

            //2. 인증 토큰이 존재하고, 그 값이 Bearer 토큰이면, 토큰을 decode 한다.
            if (authorizationHeader != null && authorizationHeader.startsWith(TOKEN_PREFIX)) {
                String token = authorizationHeader.substring(TOKEN_PREFIX.length());
                try {
                    // 토큰 유효성 검사 생략

                    //3. 토큰이 유효하다면 securityContextHolder에 인증 값을 세팅한다.
                    SecurityContextHolder.getContext().setAuthentication(authenticationToken);
                    filterChain.doFilter(request, response);
                } catch (BadCredentialsException | JWTVerificationException e) {
                    //2-1. 토큰 decode에 실패했다면, 에러 메시지를 응답한다.
                    log.error("Fail Decode Authorization Token");

                    response.setStatus(HttpStatus.UNAUTHORIZED.value());
                    response.setContentType(MediaType.APPLICATION_JSON_VALUE);

                    Map<String, Object> body = new LinkedHashMap<>();
                    body.put("code", HttpStatus.UNAUTHORIZED.value());
                    body.put("error", e.getMessage());

                    new ObjectMapper().writeValue(response.getOutputStream(), body);
                }
            } else {
                filterChain.doFilter(request, response);
            }
        }
    }
}
그리고 나서 필터를 등록해준다. addFilterBefore()는 앞의 인자값이 뒤의 필터 클래스보다 먼저 실행되는 필터로 등록하겠다는 뜻이다.
    @Override
    protected void configure(HttpSecurity http) throws Exception {
        http.csrf().disable()
                .cors().and()
                .sessionManagement().sessionCreationPolicy(SessionCreationPolicy.STATELESS)
                .and()
                .authorizeRequests()
                .anyRequest().authenticated()
                .and()
                .addFilter(new CustomAuthenticationFilter())
                .addFilterBefore(new CustomAuthorizationFilter(), UsernamePasswordAuthenticationFilter.class);
}'STUDY > Spring' 카테고리의 다른 글
| Mockito | @Mock, @InjectMocks (0) | 2022.04.06 |
|---|---|
| MyBatis | ResultMap (0) | 2022.03.15 |
| Spring Boot | Request 마다 로그 찍기 (0) | 2022.01.21 |
| Spring Boot | war 빌드, 외부 톰캣 사용 (WAS에 배포하기) (0) | 2021.11.22 |
| Spring | JDBCTemplate 사용하기 (0) | 2021.11.19 |

